Start your Open Source journey today
Get latest articles directly in your inbox
It’s that time of year again!
Yes, we are midway in the month of Preptember and few days left once the Hacktoberfest kicks in. There is no better time to kickstart your open-source journey now! The world is fighting against a pandemic and with you are at your homes. You have to agree that there is a lot more free time since the pandemic days. So, stop procrastinating and start learning - enter the world of Open Source.
Hacktoberfest is a yearly month long event which starts on 1st October where people from all over the world get started to the world of open source code and begin their journey to make world a better place by building better softwares.
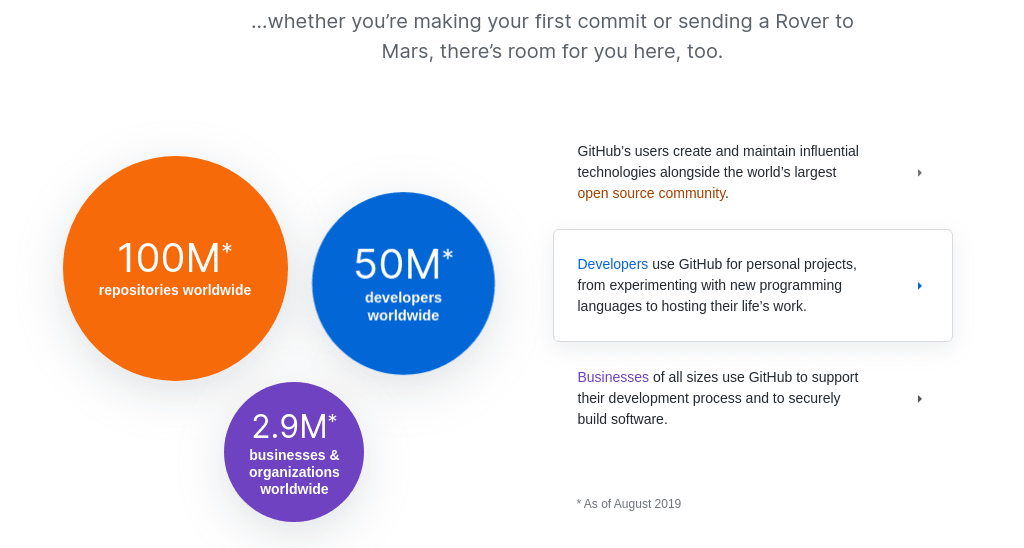
If you have written some piece of code, there is a high probability that you have used some OSS (Open source software). Those useful NPM modules, Go packages and even the Linux OS you use , yes all are OSS. You can literally go and see each and every line of the code and make improvements. That is so exciting, right?
In this article, I’ll help you out to make your first OSS contribution. We will learn the process of setting up a simple repository and understand the Git workflow. I’ll also share some of the awesome resources which help further enhance your OSS journey. Let’s begin!
Creating your first Repo
Assuming you have written some awesome piece of software (which can be as simple as a calculator program) and you want to share it with the world. This is exactly why Version control systems (VCS) like Git exist. Let’s head over to Github for this.
Github is a developer platform which offers hosting for software development. First step is to create your account on Github (if you don’t have yet).
Once you are done, let’s head over to your terminal to take your code to the world. I’ll be sharing an example here with a simple hello world website in simple HTML.
- Create a directory
hello-worldin your system. - Go inside the
hello-worlddirectory and create ourindex.htmlfile. `
  cd hello-world
  vim index.html
You can use your favourite editor and open the index.html file.
- We’ll write the most basic site ever. Add the following code to
index.html.
<!DOCTYPE html>
<html>
  <head>
    <title>Hello World!</title>
  </head>
  <body>
    <p>This is my first site for the world.</p>
  </body>
</html>
Awesome, now let’s head over to the terminal and get started using GIT. Git is a version control system, or VCS, tracks the history of changes as people and teams collaborate on projects together. It is extremely useful in managing projects across multiple people. This is probably one of those essentials I’ll recommend to learn if you are entering the world of programming. For installing Git, head over to Git-SCM.
Now, once Git is set, let’s create a new repository. Repository is basically a collection of files and folders of a project, along with each file’s revision history. This is a playground where the git magic happens.
Git setup
Initialise the repository!
git initThis initialises a new Git repository for code in current directory. This adds a
.gitfolder in your current directory. (You can check usingls -la)Let’s add our code so that git can track it.
git add index.htmlThis tells git to track the new file we created. Once, we make changes in our file, we need to run
git add <filename>again to add those changes.We need to add a remote url where our local changes will be pushed (remember Github). So with
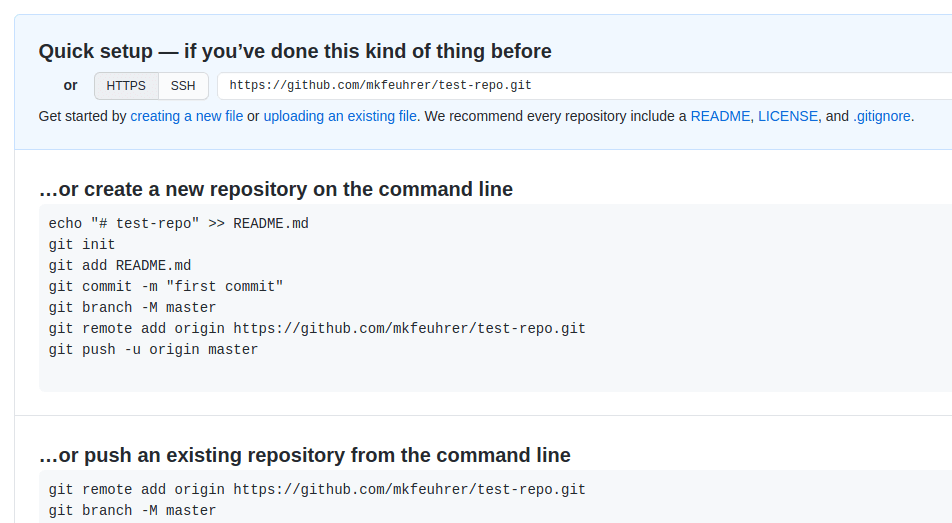
git remotewe’ll add a Github repository URL. Go ahead and create a new repository on Github. Now, move to terminal and run the following command.git remote add origin <url-to-repo.git>
Here origin is an alias on your system for a specific remote repository. You can learn more about explore command here.
- If you check your Github repository URL, you will see following screen.(with your repo name obviously)

But Wait, where is our code?
Not yet, We haven’t yet pushed our code. We just told git that this the URL where you need to push. But, before pushing we need to create a commit. Let’s create one!
git commit -m “Initial commit”
This creates a snapshot of the project’s currently staged(added) changes which are ready to be pushed. In simple terms, this means you are saving your code and changes in Git local repository.
Now, let’s push our code to our repository.
git push origin masterHere,
masterspecifies the branch to which we are pushing our code. We can maintain multiple branches when building features. Branch helps us keep our master (main) branch clean and once code is tested in branch, it can be merged into master. Don’t worry if you did not understand this, you can check this article for understanding git branches in depth.Now if you refresh your Git repo, you’ll see your code there. Yay🎉 , you just made your first commit and now your code is live to world !!
For a start, I maintain few repos which are interesting and fairly easy to contribute for beginners.
Here are some good OSS resources via Hacktoberfest
Resources
There is a lot more to learn about Git which is out of scope for this basic articles. Here are some of the resources to learn.
- Git guru - Atlassian’s Git Guide
- Codeacademy Interactive Tutorial
- Visualise Git commands
- Git SCM docs
I’ll recommend to join the Hacktoberfest challenge. You can win cool T-shirts and stickers. You’ll use OSS code almost every day at your work/ side projects. It is important you do your bit in helping the community in some or other way. Open source softwares are written and reviewed by community who follow best practices. You’ll learn to take ownership as well maintain the code quality which will reflect in your career ahead.
I hope you are now ready to make your 1st commit. Feel free to share your OSS projects in comments. Do drop a 👍 and share it with your friends.
Liked the article? Consider supporting me ☕️
I hope you learned something new. Feel free to suggest improvements ✔️
I share regular updates and resources on Twitter. Let’s connect!
Keep exploring 🔎 Keep learning 🚀
Liked the content? Do support :)